The Condense Data utility, an option available in QuickBooks 2019 and later versions, helps users streamline company data files, reducing their size while retaining all data and details. It helps improve performance when a company’s data file impacts performance or causes issues.
We have interviewed many of our QuickBooks experts and compiled this post for you to understand condensing, its limitations, and the process.
Note: If you encounter any performance-related problems, consider utilizing the Condense Data utility as a final resort to enhance the system’s performance.
Steps to Access Condense Data Utility
To access the Condense Data utility, follow these steps:

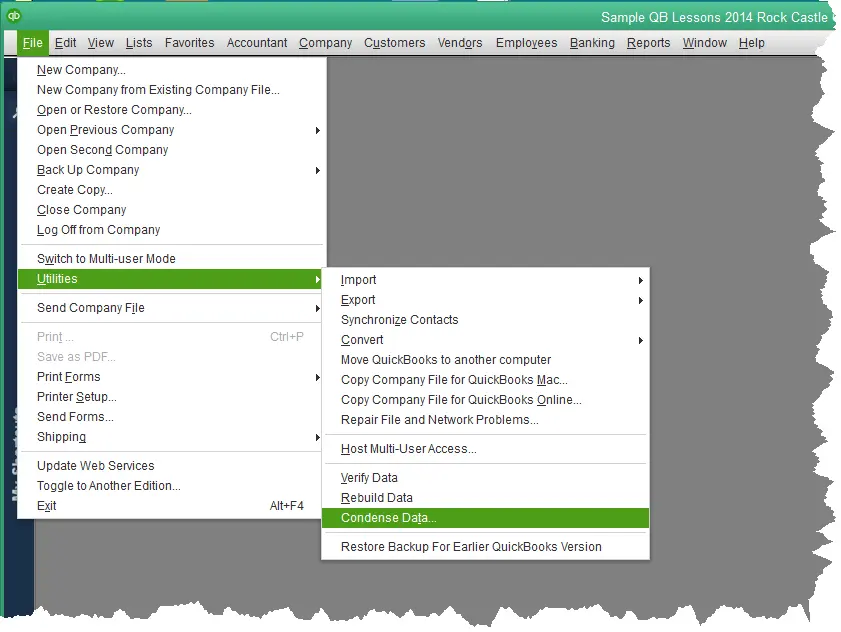
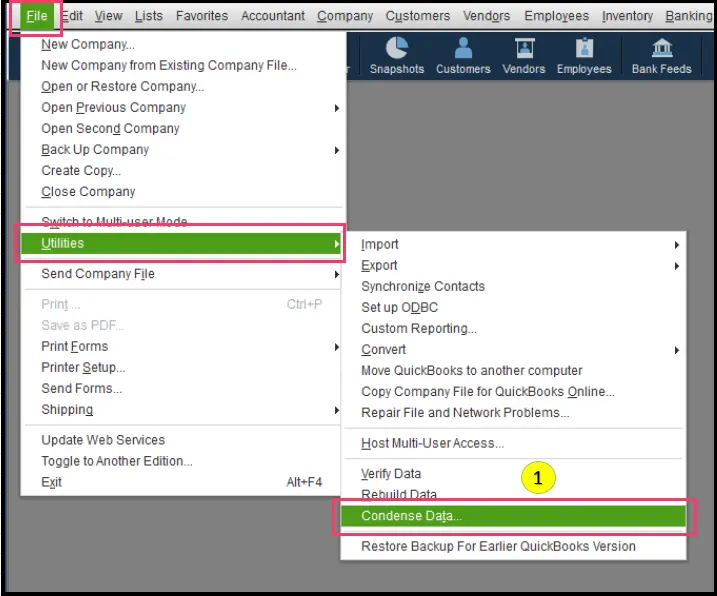
- Go to the File menu, select Utilities, and select Condense Data.
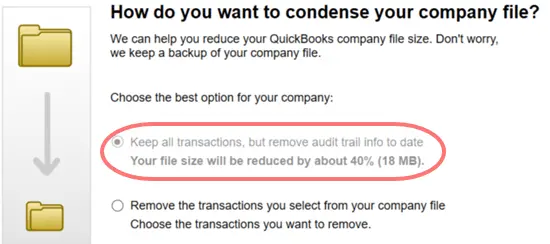
- Select the first option to remove the audit trail, and the system will advise you of the approximate reduction in your file.

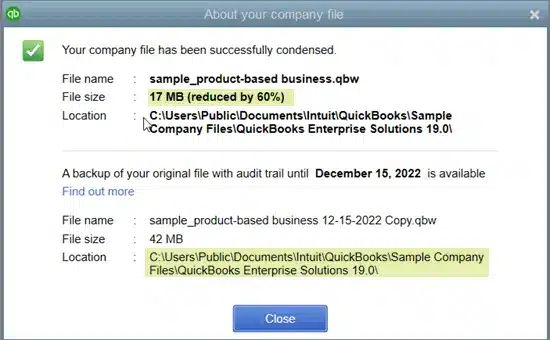
- Click on the Next button, and a message box with the message “Working on your file now” will appear. After the completion of the process, a window will appear, providing you with information regarding the total reduction in file size and the location of the backup made before the file optimization.

Things You Should Know Before You Use the Condense Data Utility
It can’t be Undone
Before condensing, it’s important to know that it can’t be undone at a later point, so make sure you use it as the last option to improve performance. Here are some major reasons tp condense:
- You have a large data file.
- You are nearing the list limit.
- You have upgraded all your system hardware.
- Your accounts team and tech support have discussed all the other options and agree to proceed with condensing.
It May or May not Affect the Size of Your Company File
Depending on whether you use inventory items, condensing may affect the company size file. Inventory items will not reduce your lists, and very few transactions will be consolidated. Thus, the file size doesn’t change much. Also, open transactions are not condensed, and the file size is unaffected.
Condensing May not Fix File Damage
In case of a damaged company file, try resolving data damage on your company file via other troubleshooting methods. In case the use of the condense feature to rectify the damage is unsuccessful, you will be left with only two choices:
- Restore a backup company file.
- Create a new company file.
It does not Remove Certain Transactions
The Condense Data utility does not remove certain transactions, including:
- Payroll transactions
- Invoices, payments, credit memos
- Refund checks if they’re not properly linked to each other
- Payments recorded to Undeposited Funds, bills,
- It is impossible to link bill credits with bill payment checks if they are not linked properly
- Estimates are linked to invoices, but sales tax is not paid in Pay Sales Tax
- Transactions associated with non-condensable transactions
Effect on Various Reports
It’s also important to note that condensing affects various reports, including:
Account-Based Reports
Account-based reports such as Profit & Loss (accrual), Balance Sheet (accrual), Statement of Cash Flows (accrual), and Trial Balance (accrual), will be accurate as entries on accounts are not affected.
Item-Based Reports
- Item-based reports such as Sales and Purchase reports, Job Costing reports, and A/R and A/P Aging reports, will be blank.
All Cash-Basis Reports
These reports for the Condense period will be inaccurate and there are no links from cash into income or from cash out to expenses.
Reports Filtered By Class
Reports filtered by Class will also be affected, as any transactions summarized by the utility will not have classes assigned.
Sales Tax Liability Report
Invoices with sales tax don’t exist. A Condensed journal entry features an amount credited to income accounts, but QuickBooks doesn’t know what part of the income is taxable or non-taxable. Also, the tax collected will show zero as it comes from the invoices, which no longer exist.
Sales and Purchase Detail Reports
The Condense Data utility does not impact these reports, and all transactions included in the report will remain intact. The sales and purchase reports are built from the original transaction data, not the condensed data. The reports, however, may take longer to generate due to the increased file size.
The A/R Collections Report
The Condense Data utility doesn’t affect A/R collections. The report continues to show all outstanding customer balances and any payments applied to the open invoices will still be reflected in the report.
The Audit Trail Report
The Audit trail report tracks changes made to transactions in the company file and is impacted by the Condense Data utility. If the audit trail is removed during the condensing process, the report will not be able to track changes made to transactions that occurred before the date selected for the condensing process. In case the audit trail is available, the report will continue to function as usual.
Reconciliation
If you use this QuickBooks Desktop feature, do reconcile all accounts before running the Condense Data utility to ensure that all transactions are up-to-date and will be included in the condensed file.
Preserving Your Reports
Before running the Condense Data utility, preserve all-important reports by either printing them or saving them as PDF files. This will ensure that you have a record of all important financial data before the condensing process takes place.
Using the Condense Data Utility for QuickBooks Desktop 2018 and Earlier Versions Before You Start Condensing the Company File
To use the Condense Data utility for QuickBooks Desktop 2018 and earlier, follow these steps:

- Launch QuickBooks and navigate to the File tab.
- Select Utilities and choose Condense Data.
- In the first pane of the wizard, select Transactions before a certain date
- Enter the date before which you want to remove transactions
- In the second pane of the wizard, select the options you want to use for removing transactions
- Review the transactions that will be removed and make any necessary changes.
- Click Begin Condense to start the process
Before you start condensing the company file, you must create a backup of the file. It will allow you to restore the file if anything goes wrong during the condensing process.
How to Back Up Transactions Before Condensing Data
To back up the company file:
- Go to the File menu and select Backup Company
- Follow the prompts to create a backup copy of the file.
It is recommended to save the backup file to a different location than the original file, such as an external hard drive or cloud storage, to ensure that it is safe in case of a computer failure or other issues.
Once the backup is complete, you can proceed with the condensing process.
How to Condense QuickBooks Desktop Company File
The steps to condense the data may vary depending on the version of QuickBooks Desktop you are using. For QuickBooks Desktop 2018 and earlier, follow these steps:
- Open QuickBooks and select the File tab
- Go to Utilities and select Condense Data
- In the first pane of the wizard, select Transactions before a certain date
- Enter the date before which you want to remove transactions
- In the second pane of the wizard, select the options you want to use for removing transactions.
- Review the transactions that will be removed and make any necessary changes.
- Click Begin Condense to start the process.
Depending on the file size and your system’s performance, the condensing process may take some time. Ensure no other applications are running while condensing to make the process quicker. Also, review the report that QuickBooks generates after selecting the transaction groups to be removed and fix every transaction you can before beginning the condensing process.
Period Copy
Period copy is a Condensed version of your company file only available in Premier Accountant and QuickBooks Enterprise editions. It only contains data for a specific period and may not display cash basis reports correctly.
To create a period copy:
- Select the File tab, then select Utilities and then Condense Data
- On the “What transactions do you want to remove?” window, select Transactions outside of a date range to create a period copy of the company file
- Set the appropriate dates for the Remove transactions before and after filter
- Follow the prompts and select the options you need
- Click on Help if you need assistance
Please note that the transactions and list entries removed when a period copy is created are the same as when an ordinary Condensed file is created.
The Journal Entries
Journal entries will be combined into Condensed journal entries with no source data, as initially there is no account to enter. These Condensed journal entries are not editable or deletable.
After you have completed condensing the company file, it is essential to check for discrepancies. Please rerun and print (or save as PDF) the following reports:
- Accrual-based Profit & Loss for all dates
- Accrual-based Balance Sheet for all dates
- Statement of Cash Flows
Compare these to the saved reports before running the Condense Data utility. These should match the pre-Condense Data reports since they are accrual-based summary reports. If you find discrepancies, note the transactions causing the differences, and restore your backup.
You may choose to do any of the following:
Repair the damaged transactions and rerun Condense Data.
- Use the restored company file without rerunning Condense Data
- Create a new company file.
We hope you find this post helpful in understating the Condense Date utility. If you need assistance, please consult our QuickBooks experts. Our certified professionals will help you determine the best option for you.


